So with the cool gabled building finished I had some more time and banged out the two story buildings. The last installment will be the three story buildings. all four of these are simpler than the gabled building so assembling them went pretty smoothly. It also did not hurt that I had already painted basically all the buildings so it was mostly just gluing. I did have a problem with the doors (I forgot to paint them) and one was missing, but once those were sorted out all was smooth sailing.
So here is the 'duplex' out of the bag. I have once again painted the building limestone and the roof and doors salmon. I have also completed the first step of the assembly by gluing the roof support together at the center of the picture.
Step two is gluing the removable second floor supports into the sides of the building.
The next step is gluing the front and back of the building to the base. This kit has slots for both these pieces unlike the gabled building. I thought this would lead to a much more stable structure than the gabled building while waiting for the glue to dry. However, it did not work that way, probably because of the paint added to the walls. Both building styles are quite sturdy once the glue has dried.
The ends of the building are the next to attach.
The walls had some 'issues' staying together and I noticed that that the timber framing called for rubber bands to hold it in place while it dried so I just borrowed the rubber bands and put them to work earlier than scheduled.
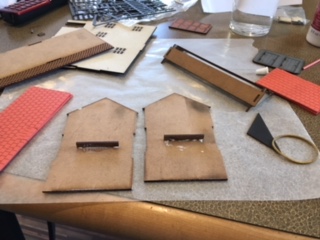
So while I was waiting for the 'duplex' to dry I started in on the single building. Here it is out of the bag.
Here I have glued the roof base together and the second floor supports in place. On the left you will note that I also went back and glued the first roof tile onto the roof support for the 'duplex'. The directions never call for this assembly so I just went ahead with it.
The roof tiles are a bit tricky as if the first one glued on is not dry enough it will move while the second is attached as the first hangs at a severe angle. I figured out if the two panels were stood up as you see in the left side of this picture it allows both tile panels to dry in proper place.
Here is a full view of the drying roof tiles. It is important to try and leave a small ... SMALL, gap between the two panels as it gives the roof pole that acts as the closure for joint to sit in place properly.
Meanwhile, I went back to the single building and glued the back wall into place. Once again, as in the gabled building, only the back wall has a peg to lock it in place and this one is a bit wobbly while under construction.
The two sides are the next to be attached.
The front wall is the last to go on.
Two significant problems arose as I worked with the smallest house's timber appliques. First, the actual appliques were a mess. I am not sure if the problem was that the laser did not cut properly, or if the small size of the elements being cut out led to problems and the cuts being incomplete. In any event these things were a mess. The charcoal like coloring got all over the place, Massive amounts of care had to be used to avoid damaging the slim pieces. Second, two of the timber pieces were warped a bit and would not glue properly on the walls. Fortunately, a couple of rubber bands solved these problems. Also in the background you can see the roof of this building standing up to dry.
Here the timber framing has been added to the 'duplex' and once again the rubber bands hold all in place while they dry.
Here are the two buildings finished side by side. The doors are missing as they are drying and will be added later.
Here are the finished buildings from the back.
Again these turned out very nicely. The timber framing was an even worse mess in these buildings than the gabled version, but all worked out in the end. The single building's door was missing completely which was a problem but I found a piece in the left overs from the past building and painted it when I painted the other doors.
With all five of these kits the trickiest part is that the roof is designed to have a chimney in it. For the chimney, a hole is cut in the roof. That hole needs to be filled in to present a proper Roman roof. The filling is not perfect, but it is good enough to not show in my pictures and just look like a poor job of fixing the roof.
But anyway, three down, two to go and generally going very well.


You are really killing it with all these buildings!
ReplyDeleteYou got so much done so fast. 😀
All these are gonna make a great game table!
Thank you Stew.
ReplyDeleteI have always liked the urban skirmish games that have lots of terrain. So that is what I am going for here. I ended up buying a couple more buildings from Empires at War to get some better shops. They will require a bit of "adjusting", but I think it is manageable.
The E.A.W. kits go together easily, although these timber framed pieces are more difficult than the earlier ones. The Sarissa kits are more complicated and some of them not very sturdy despite my well known, amongst the guys around here anyway, heavy hand with the glue. But it kind of finds a groove once you get going on them.