Deck Guns and Portholes.......
the Captain is impressed with his additional firepower
Having done all the easy stuff I finally resigned myself to adding the last details and getting on to the next project. The remaining steps are adding portholes, building the deck guns, completing the bridge equipment, coming to a decision on the smokestack/lifeboat arrangement and weathering the paintwork. This would amount to a long afternoon's worth of work but I don't have a block of time like that so I decided to break it down into bite-size pieces. First I decided to cut openings for the portholes. The portholes that I had purchased from Reverisco were intended to be inserted into an opening in the hull and would have looked odd if I had just glued them to the surface as is. Thus I needed to cut openings. I tried using an electric drill (fortunately on a bit of practice work left over from a railing prototype as it was a complete disaster) without success, I decided that I needed a slower, more controllable, method. I remembered seeing a PBS special on Quakers using hand tools for fine woodworking and one of the items was a sort of twist-drill that you held in your hand like an awl. A bit of digging around produced an old bit of brass tubing and I was off to the races.
an old plastic cap and some masking tape form the handle of the tube
the business end needs sharpening
step one is opening the inside of the tube by carefully scraping the inner edge with a razor
step two is adding an edge by sanding the outer surface,
be sure to push the tube forward as this creates a finer edge
and prevents burring which will cause uneven cutting
the tool is now ready, push gently against the surface while slowly twisting the drill,
it should cut clean even holes, remember to sharpen it often to keep a clean cut
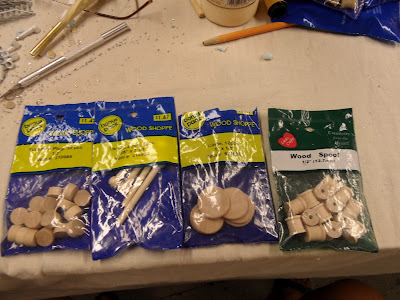
Making the Deck guns turned out to be far easier than it looked at first, this was greatly assisted by the availability of these handy wood products. These are generally available through Arts & Crafts stores you will need the following; one bag of tie-rack pins, one bag of small wooden circles (1") one bag of small spools and one bag of wooden plugs (the last are used in furniture-making to cover holes where screws have been inserted into the work). This will provide you with eight deck guns of medium caliber (3.5" to 6") if you are modelling in 28mm.
hardly the Krupp works
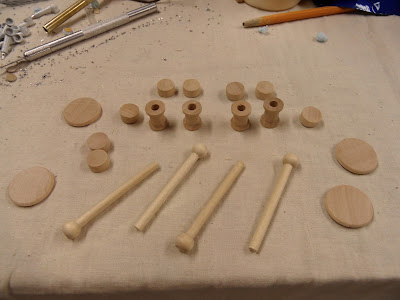
building in batches helps speed things along,
here we see the component for four cannons
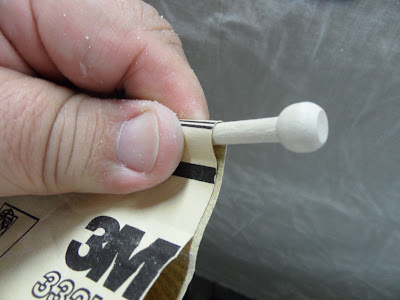
the wooden pins often have noticeable grain
so sanding them before starting assembly is a good idea
pedestals ready to mounted on the bases
with hardwood products a small amount of glue will hold very well and dry very quickly
(this is too much)
be sure to center the pedestals on the bases before pressing into place as the glue sets very quickly
the plugs have a very slight taper, we want the wide end to be uppermost for this project
again, a small amount of glue and careful centering before pressing into place
the pedestals and pivots are ready
the plugs will have a turning mark (generally a little dot of wood) in the center,
use this as a guide while cutting four of them in half
these parts will form the basis for the gun mount, keep them in pairs
the parts should be equally sized, trim as needed
as long as I was waving a razor blade around
I thought I should go ahead and fabricate the gun breaches,
I cut the round knob on the end of the tie-rack pin so that there were three flat sides
to start the process
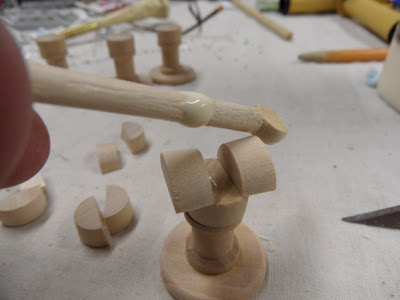
this gun was acting as the master copy so I went ahead and added the gun mounts and the barrel
notice the the narrow ends of the plug are facing inward, this is a matter of taste as I thought it looked better than the other way round
the next group of guns were now ready to go together
here you might be a bit more lavish with the glue
as the contact points are small and the glue will fill some of the gaps
I built two more guns just to get rid of some extra parts
but this whole step took about three minutes
cutting the gunner's shield from folded card stock
doing it this way ensures that you get them the same size and shape
like a child's paper dolls they unfold
cut along the fold lines
and glue to the side of the breach
I added a lever to the other side of the breach to open the block
and a bit of card to the top to square things up a bit
now it is time to go to Rivet-City!
a half-hour later and I was done
side view
front
the other side
a slightly different look can be had if you use the "flower pots" wooden bits
instead of the spools for pedestals, some mounts were very much lower
and you could reasonably use another plug instead
a bead of pink forms the opening of the breach
There you have it, eight guns in less than an hour and only about twelve dollars in materials. these will provide deck guns for the Armored Cruiser and the main battery for the protected cruiser that is coming next.


Good job modeling. Thanks for sharing your vision and work.
ReplyDeletehttp://colonelotruth.blogspot.com/
ReplyDeletego there. now.
That walker is a beauty, the detail is amazing!
ReplyDeleteyeah, i was going through all the different things in the weapons of mass delusion. very nice.
ReplyDeleteIt is freaky how many individually applied rivets he puts on things, I think that I would go completely nuts!
ReplyDelete