Now here is what a modern recreation of a Roman Market looked like


The directions say to glue the support sticks together then glue them to the cover

In the interim I have spray painted the boards a basic sun bleached linen color
as a start for the shopping stalls.
And then glue them to the cover. However, this did not work very well as the stick that connects the supports does not hold well as the cover is attached. So I decided to try it the other way. Below I have glued the support sticks to the cover.

And then glued the cover on top.

Here is the finished product.

Repeat six more times and all eight stalls are built.

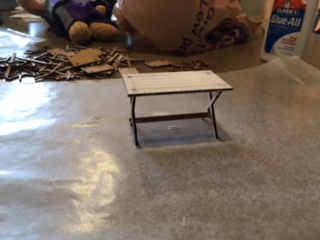
Now it is time for the tables. This odd little elongated tic-tac-toe board goes under the table for the legs to be attached. There are also four holes through the table and one peg on each leg. The peg goes through the hole and straddles over the support to both hold the table and lock everything in place.

I looked at the structure and since one support side was longer than the other
I decided that this was the way to insert the legs.

A full set of legs attached.

Here you can see a "completed" table and a leg prior to attachment. However, after completing four tables I happened to glance at the directions and noted that I was building the blasted things incorrectly. Turns out I am supposed to glue the legs over the smaller arms of the support. This revelation led to a few stressful moments as I carefully worked the improperly attached legs and reattached them properly. When all else fails read the directions.

Here you see a properly attached set of legs.

Here are all four legs properly attached.

Here is a finished table.

And once again thanks to the magic of photography here are sixteen properly finished tables.

After painting the edges of the sunscreens and the obvious "straps" on the sunscreens to try and mask it to look more like a sheet with "colorful" trim.

Next up comes the Slave auction stage.
This is a stone simple item. Literally, the stairs have more parts (7) than the stage (5).

I actually glued the kit together and forgot to take the pictures! The back support structure of the stage with the posts is one piece. The front support structure is one piece. The sides are each one piece. The deck of the stage is the fifth and final piece. The stairs are visible in constructed in the foreground.

Four steps, one support underneath you can not see and the two sides. Poof done!

Slightly more complicated than the auction stage is the slave pen shown as it arrives above.

The first step is to attach this small support to the front wall to allow the door to swing freely.

Next glue the cage front in place being sure to insert the door and avoid gluing it in place.

Next glue the right side to the base and the front (you can start with either side really).

Then glue in the other side. Do note, because you are gluing the cage walls to both the floor and the in place walls this does get a bit more complicated with each succeeding wall as you have to make sure that the existing parts stay in place.

It really does come together well.

The top of the cage simply drops into place and can be removed to allow figures in and out of the cage more effectively than the door will allow.

Finally, here is the slave set completed.
Due to the harsher nature of history they represent, even in small scale, these pieces convey some of that darkness. I find them a bit somber. It was an accepted part of life back then, and certainly not the nonsense that Hollywood always portrays, the Gladiators after all mostly volunteered to become slaves for a chance at the fame and fortune; but slavery always represents such a loss of potential. I always wonder what else could have been done if those people were free to pursue their own ideas. Well, that is enough editorial for one review.
Overall, these kits are easy to build. I have purposely waited on the more difficult kits and will start on a harder one (the Temple) next. My first reactions to these kits are that while they are easy to build and have a better finish at least for wood. However, they are also more flimsy than the E.A.W. kits I was previously building. The MDF used in these Sarissa kits is less than half the thickness of the E.A.W. kits and thus these feel like I need to be "gentle" with them. The E.A.W. kits are 5mm thick, while Sarissa claims that their kits are 3mm, but at least on the kits reviewed here I only measure 2mm. With the "ham handed" folks I game with "gentle" is not what I look for in my gaming. I have serious concerns about the "survivability" of everything I built in this review.
The Sarissa products are certainly in a realm of their own currently as E.A.W is only just starting to release their Roman range. Both ranges have some severe problems in terms of historical accuracy. But if you want this era, generally both have their place in your collection.
The Housemartin
Looks very nice!
ReplyDeleteExcellent bits of kit. I do like the slave stage.
ReplyDeleteNice, I am waaayyy slower putting mine together, but you are inspirational. Maybe I'll trudge over and grab and to do building from my pile.
ReplyDeleteCheers
Kevin