Editor's two cents:
We did our usual shenanigans of dicing for which book/which half and found ourselves in the first half of the third book. In the interest of further hobbling ourselves we agreed that I should pick an army and The Housemartin would choose a historically legitimate opponent. In a further act of madness I resolved to choose an army that I have never played before. After consulting my supply of Light Cavalry I selected Cumans with the idea that playing on the larger 5x8' table would allow them to skirmish properly. I've never had any luck with cavalry and I hoped this would be a turning point.
In riposte to Anton's loony choice of the Cumans, I responded with the Teutonic Order, I figured that since the army lists said that the Teutonic Order were the ones who destroyed the Cumans I might have a chance in the sand storm headed my way. Anton outscouted me 204:13, so my army deployed first.
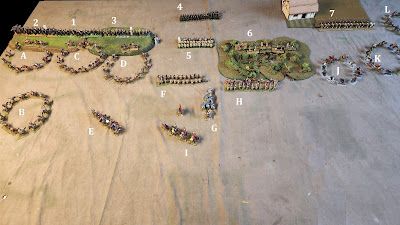
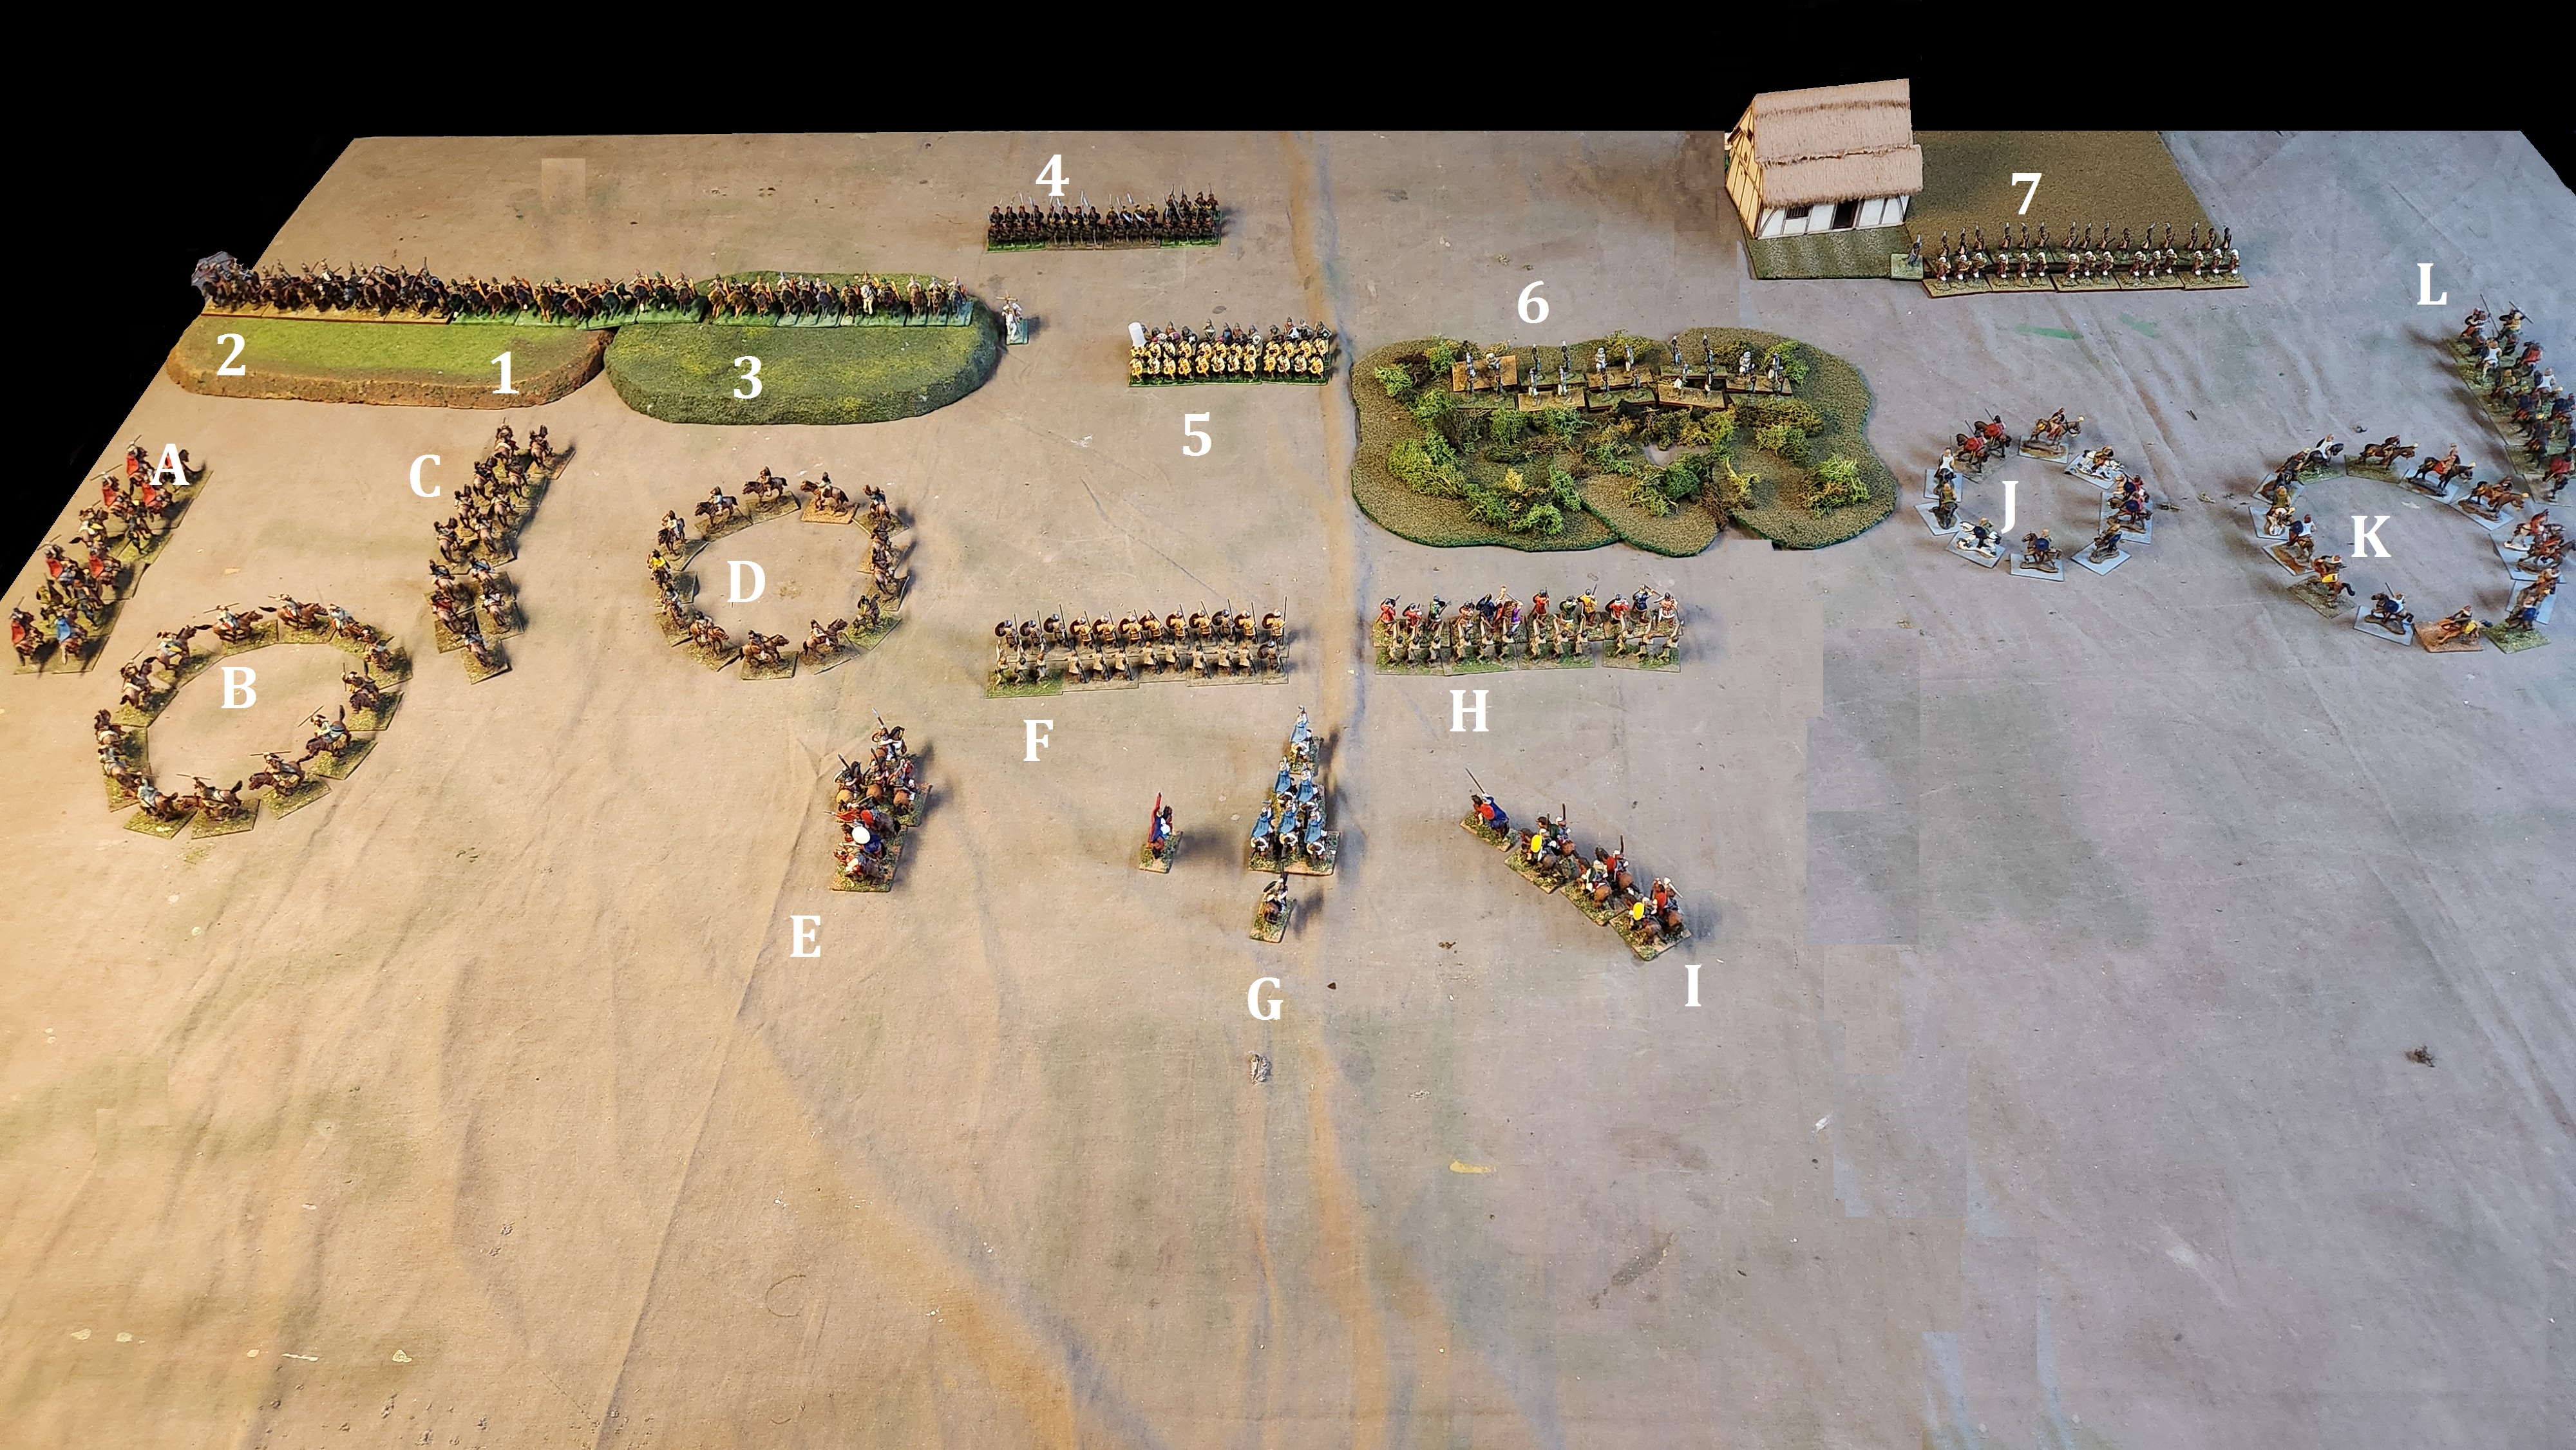
From left to right in the back my army is as follows.
Unit 1 12xConfrere Knights, REG B, EHK, L & Sh
Unit 2 12xBrother Sergeants, REG B, HC, L & Sh
Unit 3 11xBrother Knights REG A, EHK, L & Sh 1xBrother Sergeant, REG B, HC, L & Sh
The Teutonic Order CinC stands between Units 3 and 5 with his PA standard
Unit 4 36xColonists, IRG C, MI, JLS & Sh
Unit 5 36xFoot Sergeants, REG C, HI, 1/3 LTS & Sh, 2/3 CB
Unit 6 22xProthenians (your guess is as good as mine), IRG D, LI, B
Unit 7 31xMercenaries, REG C, 6-LHI, LB, 2HCW; 10-LMI, LB, 2HCW; 15-LHI, CB
In response Anton deployed his untrained mob as follows from left to right in the front
Unit A 12xGhuzz, IRG C, LC, B
Unit B 13xCuman Skirmishers, IRG C, LC, JLS, B & Sh
Unit C 13xCuman Skirmishers, IRG C, LC, JLS, B & Sh
Unit D 13xCuman Skirmishers, IRG C, LC, JLS, B & Sh
Unit E 7xCuman Nobles, IRG B, HC, JLS, B & Sh
Unit F 24xCuman Foot, IRG C, LMI, 1/2 JLS & Sh, 1/2 B & Sh
Unit G 7xCuman Nobles, IRG B, HC, JLS, B & Sh
Unit H 24xCuman Foot, IRG C, LMI, 1/2 JLS & Sh, 1/2 B & Sh
The Cuman CinC with his PA standard is behind Unit H
Unit I 7xCuman Nobles, IRG B, HC, JLS, B & Sh
Unit J 13xCuman Dregs, IRG C, LC, B
Unit K 13xCuman Dregs, IRG C, LC, B
Unit L 13xCuman Dregs, IRG C, LC, B
This shows the situation at the end of Turn Two. On turn One, Anton advanced on all fronts. My central troops advanced on the first turn and stood still on the second. After deployment my CinC could see that he needed reinforcements on the left so dispatched the Colonists to assist the Mercenaries in the village. My Pruthenians (Turns out they are old school Prussians, or "Prussians" before they were "Prussians", which makes no sense as the army can also have "Prussians") rushed into the scrub and then opened fire on Anton's advancing Cuman Foot Unit H. Meanwhile on the left my Knights and sergeants waited behind the crest of the hill to avoid as much missile fire as possible. In the mean time my sergeants moved to the extreme left to cover the flank of the knights. On the far right I advanced my crossbowmen out of the village and had the Longbowmen stand in the village.
On turn Three, three of Anton's skirmisher groups crested the hill and tossed javelins at my knights and sergeants. My knights suffered 'the slings and arrows of outrageous fortune' (Javelins actually) with humble dignity, I specifically allowed Anton to shoot at the one Sergeant in Unit Three and got lucky that he only killed one figure. But with the other unit of Knights (Unit 2) I managed to only suffer 5 casualties, but I rolled a "3" and suffered the casualty anyway. In the center my foot sergeants and Pruthenians exchanged missiles with Anton's Foot Cumans and my mercenaries were left to fend off all three Units of cavalry on the extreme right. It turns out that LHI do alright, even when badly out numbered in a missile fight. These Mercs would tie up Anton's three units of dregs all game long. My reinforcements would not be needed.
On turn Four, my mounted sergeants and both units of knights charged the three offending units of Ghuzz and Cuman skirmishers. Anton's Units A and B managed to roll well enough to escape my Knights wrath. However Units C and D were caught from behind by my Knights and their evade quickly turned into a rout. In the middle my CinC joined the foot sergeants in order to change their orders and have them advance in support of the Knights. Meanwhile Anton Cuman Foot Unit H refused to advance into the scrub due to the volume of fire the Pruthenians were delivering. The situation on the right continued with my mercenaries causing as much or more than the received.
In the movement phase of turn Four Anton guessing how the slaughter of his skirmishers would end up carefully positioned Units E and I for flank charges on my pursuing knights.

On the reaction tests for my mounted sergeants a high dice roll (14 out of 15 possible) resulted in them going impetuous and charging Anton's Skirmisher Unit B (closest target). From there my Teutonics went ... Teutonic! The Confrere Knights (Unit 1) followed the sergeants example, went impetuous and charged Anton's Noble Unit E. My Regular A Brother Knights then lost their minds and went impetuous and charged Anton's Noble Unit G. However the Brother Knights were also struck in the flank by Anton's Noble Unit I. Meanwhile my Foot Sergeants and Anton's Foot Cumans Unit F charged each other and my Foot Sergeants also went impetuous, dragging the CinC along with them. In the scrub Anton's morale improved and his Cuman foot unit H advanced into the scrub, but still would not charge my Pruthenians. The situation on the right remained a stalemate. In the melees, My Confrere Knights (Unit 1) broke Anton's Unit E. My Brother Knights (Unit 3) pushed back Anton's Unit G, but were routed by Anton's Unit I contacting their flank. My Foot Sergeants pushed back Anton's Foot Cumans (Unit F). Because of all the routing friends, Anton's Unit B had to take a morale test and failed, converting their evade into a rout

On Turn Six, Anton's Unit H finally screwed up the courage to charge my Irregular D Pruthenians, who promptly ran and hid behind my Colonist foot troops who advanced to near the scrub edge, just in case Anton thought about coming out. Unfortunately that was the only thing that went Anton's way Turn Six. On the left, Unit A failed its morale test and joined Unit B routing off the board. Unit C was on the verge of being routed off the table to join Unit D which had also routed off the table. Anton's Unit G was caught by my impetuous Unit 1 Knights and routed in combat. My Unit 3 Brother Knights managed to outdistance Anton's pursuing Unit I. And finally, Anton's routing Unit F failed to outrun my heavier Impetuous Foot Sergeants and were mauled once again. At this point Anton conceded the game.
Overall, Anton's skirmish hordes probably would have done much better if the terrain gods had not been so kind to me. Having the two gentle hills on the left side and scrub in the center as well as the village effectively gave me a bastion for my knights to sally forth from once Anton had closed to try and dislodge me. Things would have gone much differently if the terrain gods had not been as kind.


No comments:
Post a Comment