
I really have to start making a plan before I get the tools out
It evolved like this; once I had circles I then cut smaller circles out of them, just for practice. Then I had a bunch of rings, each smaller than the other. So I did it all over again, just for practice....eventually I had a bunch of stubby cylinders. Just to be tidy I stacked them up in like-sized groups. I was instantly struck by how much they looked like medieval towers.

a stack of cylinders looking suspiciously "keepish "

of course, keeps have floors, easy enough, just a bit of cardboard

I set the Proxxon at an angle and cut the lower disc into a base with a talus

of course, keeps aren't built of blue board, they are built of blocks of stone,
or in this case, blocks of blue board!

and they have nifty spiral staircase, so I cut a hole in the floor for one

I started on the inside so that my early mistakes would be hidden from view,
it was very therapeutic, almost like putting rivets on one of the boat models

a couple of hours and I was about half done

then I built that nifty spiral staircase, it wasn't until I was finished
that I realized that I should have built it the other way around

I was happy enough with it
no, I won't be building a different one,
they are supposed to ascend clockwise

after I had finished the brickwork I realized I needed a base
so I whipped one up

can't have people falling down the stairwell so I added a railing

then I added crenelations to the top wall
all that is left is windows, and finishing the base, and painting it all
when will I ever learn?

a 28mm Old Glory knight for scale

he seems more enthusiastic than I am right now
There you have it an evening and an afternoon spent playing with toys.
Suddenly that paintbrush looks inviting!
And now with paint, I mixed a bottle of Americana Lamp Black with some wallboard putty then painted it on with a wide stiff brush


Not content with the color, or the total lack of windows (this is what I mean when I say I REALLY have to start working to a plan) I went ahead and made a pile of windows and then set about sticking them all over to tower. After this was done I then painted the windows and laid on several layers of weathering.


And now with paint, I mixed a bottle of Americana Lamp Black with some wallboard putty then painted it on with a wide stiff brush

the putty between the bricks looks like mortar and helps bind them to the model

this is the first time that I've tried this on a whole model

I think that it worked pretty well

painting inside the tower was a bit of a trick!
Not content with the color, or the total lack of windows (this is what I mean when I say I REALLY have to start working to a plan) I went ahead and made a pile of windows and then set about sticking them all over to tower. After this was done I then painted the windows and laid on several layers of weathering.

to make the windows I cut strips to match the section of the head, sides and lintel ,
then I sliced off dozens of thin strips so that I had loads of matching parts

I stuck them all over walls of both floors and up (and under) the stairwell

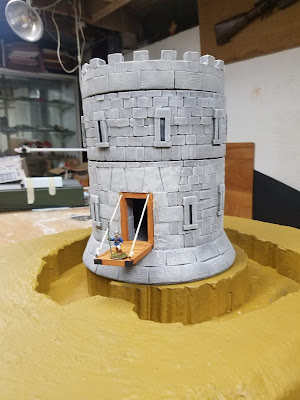
then I realized I needed to build a drawbridge

it didn't need to be terribly long, just a few inches

I kept adding more white to each layer of drybrushing but the gray kept eating it up,
finally I used almost pure white, that seemed to do the trick

of course , when you have a drawbridge,
you need lifting apparatus,
so I built one

and being a giant nine-year-old, it had to work

nothing says "No Solicitors" like a lifted drawbridge
(note to our British friends, in the USA a solicitor is a door-to-door salesman, not a lawyer)
but I'm not a fan of lawyers either

a 25mm Old Glory footman for scale

I can almost hearing him thinking
"well isn't this a jolly sight, there is no way I'm jumping down that"
You needn't worry, the baby-barf brown that is on the base is only a primer coat. I will be painting and texturing the surface tomorrow (or the day after, retirement has wrecked my sense of urgency) and thyen painting it and flocking the whole thing.
What a wonderful way to spend an afternoon, that keep is very nice indeed! I'd say the heck with planning if this is where you end up flying by the seat of your pants.
ReplyDeleteLooks very Skyrim-ish.
ReplyDeleteI'm looking forward to the final results. That looks very good indeed. I totally get the need to swap over from figure painting every now and again.
ReplyDeleteThat is fantastic, can't wait to see it done.
ReplyDeleteLooks amazing......think I may have to invest in the tools to do this.
ReplyDeleteReally basic question.....what is the blue foam n where do you buy them?
Yhanks
It is the blue insulation foam, technically extruded polystyrene foam, (also sold in pink....there is a difference for builders but to me there isn't any, blue is just easier to paint over that pink) sold at big-box builder's supply stores (Lowe's, Home Depot) and most good lumberyards. It comes in different thicknesses. It doesn't have beads like the white stuff does so you can shape it without worrying about breakage or beading. It is also substantially stronger so there is less chance of damage during handling. Look under "Adventures in Blueboard and Foamcore" in my blog header for an idea of what we have made with this stuff, it is pretty amazing what you can do!
DeletePretty cool. It’s awesome that you could just whip that together. I keep thinking that I’ll one day invest in a foam cutter so I can do easy hills and such.
ReplyDelete