I hope you enjoy this as much as I did, I think a colonial gunboat is in the offing.
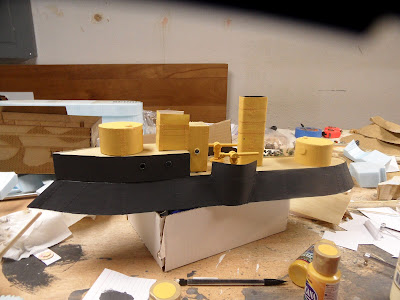
the major components build and test-fitted together
the techniques used were the same as I used in building the Armored Cruiser
(scroll down almost to the bottom of that page to find the posts on that build)
the sub-assemblies unassembled, I planked the deck before I added the hull plates,
that way I could sand the edge of the planking and the side of the hull at the same time,
I did forget to inscribe the planking detail beforehand, a costly mistake,
for planking I used hard 1/32 balsa in a 4" wide sheet,
I scribed it with a hard sharp pencil and a straight-edge
hinges and a door handle; I couldn't resist adding a few little details
the card-stock was coated in a thinned mixture of glue and water
to harden it and smooth the surface for painting
then it was "rivet-time",
the pink is easy to see but difficult to cover with paint
all that rivetty goodness,
one day I hope to grow up and have the nerve to apply them one at a time from cut stock,
like Col. O'Truth, my hero and inspiration
more little details,
a sighting hood on top of the turret and a hinge on the rear door panel
at times I went a little crazy
a deck hatch from wood discs and paper
after painting I put the parts together to check the look,
the yellow was far less overwhelming than on the Armored Cruiser
a significant gap had worked its way into the joint between the forecastle and the lower hull
(this must be a flaw in the manufacturing process, I never make mistakes, ever, no really, I don't)
this would requires some tricky work later to correct
the colors, I chose a dark gray rather than black
the previous build showed that the black was a bit overpowering
sometimes I get a little sloppy when cutting the foam that makes up the core of the models,
this means gaps, gaps must be covered,
so like a real ship I used joining plates to attach the con to the hull,
these act like moldings in a modern house by concealing the unsightly gaps that the workmen leave between vertical and horizontal surfaces
thin strips of card. folded along a straight-edge. and then cut to length,
these were fitted to the con....
...........and adjusted into place while the glue was still wet,
in this picture you can see my fix for the mis-fit between the upper and lower hull sections,
I added more joining-plates to cover the gap (the white strip that runs along the side of the hull, below the port-holes) again simply strips of card, carefully positioned and glued in place
after rivets and paint the con was test-fitted again
the strips neatly concealed the unsightly gaps
after ensuring a tight fit I glued the con down,
a thin bead of the ever-present Titebond glue
after carefully positioning the con the edges were tamped-down with the tip of a paintbrush handle
to ensure a good bond and no gaps (if you look at the lower portion of the picture you can see the joining-plate covering the hull gap, it has been riveted and painted)
the glue that oozed out was cleaned up with a wet paintbrush
the smokestack was the next step, this was too much glue,
it oozed out everywhere, requiring a lot of clean-up
the deck-hatch, ready to install
and there it is
ready for trial runs, the armaments have not been properly fixed to the hull yet
Count Nakimoff likes his new ship
3/4 shot
bow
top-down
stern view
side view
There you have it, a quick build as I am becoming more confident and spotting ways to save time during the building process. All that remains are railings and boats.


A wonderful build, Sir!
ReplyDeleteVery nice indeed- is a naval battle in the offing?
ReplyDeleteAs soon as I get another half-dozen finished
ReplyDeleteSplendid! I'll look out for that.
ReplyDelete