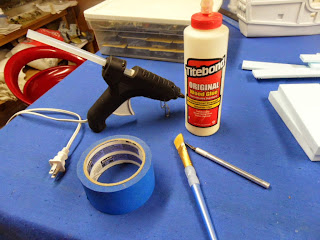
the contents of the box may vary slightly but it should look like this
thje tools you will need, a razor-knife with a fresh blade, a hot-glue gun,
a wide stiff brush, some masking tape and alarge bottle of good wood glue
fisrt step is to sort the parts, there will be two long 1/4" strips, several shorter ones,
some 1/4" square stock and a lot of 1/4" x 1/16" stock; set these aside for now
with the strip stock aside you will find these remaining parts; the hull,
the forecastle, the sterncastle, the bow, the well deck filler and some sheet stock
I forgot to add that you will need some 60 grit and some 120 grit sandpaper,
get decent quality stuff, cheap paper will make you work much more tedious
because there is some sanding in your future!
lay the sheet of 60 grit on a flat smooth surface and begin smoothing out the sides,
not much pressure is needed, this will be messy, do it outside if possible
clear the dust off the sheet often,
if you don't pills will form and the foam will just roll along on them
once you have both sides pretty straight begin work on the bows
when you are doing this you can add some curvature to the hull section,
early ships were very round, later ones less so
here we see one side rounded the other still vertical, don't mind the fuzziness
much of it will so away when we switch to 120 grit
I like a nicely rounded bows, don't make it too narrow,
these are wargaming models and they need a wide and stable base
next we move to the stern, in reality the cutaway aft would be
much more significant to allow water to flow smoothly over the rudder
the taper fades away about halfway to the bow,
sand this to make it a smooth transition
stern view, the lower edge has been rounded enough to look OK
but is still wide enough to remain stable during games
blend the curve in as you move forward
the forecastle needs to be smoothed as well,
gently pull the curve over the sandpaper using light pressure,
check against the hull often as you work
nice and smooth
the sterncastle is all straight lines and needs little sanding
both castles are 1/4" smaller than the hull to allow for the side to fit flush,
but the stern does not have the set-back and will be assembled as seen above
having done individual planks before (see here) I will not repeat that effort but show you my preferred method now; first you need to establish the center of the long axis of the hull,
pick two places a good distance apart and measure across to find and mark the center
mark the forecastle and sterncastle the same way
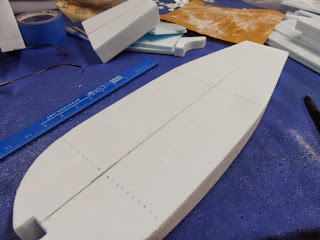
with the centerline laid mark off 1/4" increments
moving outward until you reach the edge of the hull
use a medium size ball-point pen,
gentle pressure will incise the deck so that even after painting you can see the planks
yes it is tedious, but nowhere near planking, believe me!
exact evenness is not required, these things weren't made in factories
this is the time that you would add a slab of balsa or plywood to the well-deck area if you wish to strengthen the support for the mast, if you are going to use the well deck filler you would do so now following the steps seen here
Ta-Da!!


amazing - very creative!
ReplyDelete