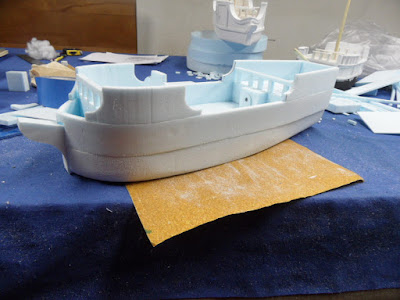
she sure is pretty with her upper works installed
and the hull lightly sanded to even off the rough bits
but, even after switching to 150 grit she looks a bit, well, "fuzzy"
O.K., O.K. REALLY fuzzy
and you were wondering what this was for in the original tools list,
it is a type of brush called "bright" it is almost flat in profile and has semi-stiff bristles
don't buy top-quality, we will be abusing this brush
wallboard filler compound,
I try to always get the latex-based type as it has a bit of flexibility to it
add a small spoonful of water and work it into the compound,
it should be the consistency of peanut butter when you are ready
NOTE lots of other people use things like Durham's Water Putty or Autobody filler,
whatever you choose be sure of these two things;
1, It is easily sandable and;
2, It doesn't have any solvents that will melt the foam board
with the filler mixed you scoop a big blob of it onto the brush and......
paint it across the surface of the model,
try to keep it as thin as possible to ensure the quickest drying time and reduce the chance of chipping
oh yes, she looks much better now!
the next step involves sanding the surface lightly with 60 grit and then more comprehensively with 150 grit (you can go further to finer grits but you will have much less return on your time invested)
so outside if possible to do this, it is going to create a real mess
sleek and smooth
I add a coat of flat white latex at this point to fix the surface of the model and to give a better look at any remaining flaws, flat white is very unforgiving of blemishes
after the paint has dried overnight we are ready for the next step, rub-rails and trim
pre-forming the part, I am referring to this as the rub-rail
there may be a cooler nautical term for it but this is my term for it
let the rub-tails over hang the stern and trim them to flush
carefully cut around all three sides to prevent splitting
sand away any burrs
I used extra deck planking for trim for a more elegant look
the thin section accepts a curve very well
and then back to trim
and more fancy bits
those railings from earlier have reappeared
the model is ridiculously light, try this with a 22 inch long resin model
a last look at the stern


The side strips are called gunwales (sometimes gunnels) and were originally added to the gunnery decks as a way to strengthen the hull to withstand the stress of firing the ships guns.
ReplyDeleteYour model looks fantastic - I am very impressed with your skills and am really enjoying seeing this project unfold.
thanks
Hi all, for those in the UK awaiting their kits they have arrived with me and as soon as I can get some suitable boxes they will be on their way to you.
ReplyDeleteAndy Mac
Anton,
ReplyDeleteFirst I want to say thank you very much for the fantastic ship model you sent me. I didn't hear anything back so I wasn't sure it was coming. Now the important part. How would you like me to pay for it and how much? I can pay via check, PayPal or other method. I can trade figures, some ships, or wampum (last one is a joke, unless you want beads) - your call. I have a 28mm painted smaller sailing ship that I can send back to you in exchange if you would like. Your call. Again, Thank You. Scott Landis
Scott (and everybody else) I have decided that I would eschew payment as long as you made a donation to the USO (or other appropriate local agency in a similar vein). I trust to the sterling qualities of gamers and do not ask that you verify the donation, just that you make it.
Delete