So having laid down the gauntlet to Anton and awaiting what will be, I presume, his epic response; I have moved on to other things, as the title says "less un-promising problems.
Have I lost my mind? Have I meandered into training? You will have to read on to see.
But here is a very small hint
Robert Watson-Watt, the man who uttered the quote that titles this post.
That is called a "tease". Anton deserves my best efforts as the principal guest poster on his blog, and thus I descend into click baiting.
Now suppose you know that a war is brewing and your bosses would like you to create a "Death Ray" because your bosses had read Jules Verne and H.G. Wells too much when they were lads. That is where Robert Watson-Watt found himself through most of the inter war years. Eventually he convinced management that there was another possibility to pursue that was in Watt's words "still difficult, but a less un-promising problem." Enter this project.
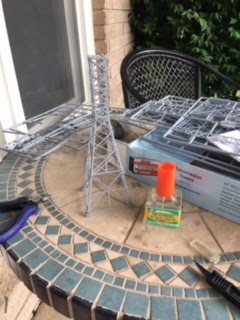
Here we have the un boxing.
I actually bought these kits back in my All Quiet On The Martian Front build up. I thought it might be cute to have Martians worry about walking into power cables. However, after purchasing the two kits you will meet in this post I remembered that the game is set just prior to World War I, and there was just not much electrification outside of large cities so this got 'back burnered' until this new prospect emerged.
Here is a single tree of parts from the Kit. It takes two such parts trees to build an entire tower and the box contains eight trees for four total towers. I paid $20 for this box several years ago on ebay and have no idea what they cost now.
Here are the two sides and two braces glued together from one parts tree. Some care is needed in construction as there are no spare smaller supports (at the waist of the tower above), you need two and receive two per tower. The larger support gets two supports per tower and you only need one so there are plenty of these in the kit.
Here is the completed first tower with all three supports inside all four sides. The observant will notice that I have removed the arms from the tower as they are not part of my plans. I have also cropped the pointed top as it is not part of what I am building. These modifications were done with the assistance of my no name brand clippers and some x-acto trimming.
Here are all four towers completed construction. My apologies on changing in lighting as the mosquitoes came out forcefully and I retired into the house to preserve my blood supply.
The other reason why I abandoned the Martian electrification project was that I was not careful and accidentally bought two different types of power towers. However for this new project the differences were just perfect. By the way these also cost me about $20 on ebay when I purchased them, again no clue on current availability and price.
Here is the unboxing, this time there are five towers in the box instead of four.
Once again it will required two parts trees to complete one tower and the box includes 10 parts trees.
Here is the completed first tower. I have once again removed the arms of the tower as they are not part of the plan and cropped the pointed top of the tower as it comes from the factory. I also took the insulators that were designed to hang down from the arms of the tower cut them down and glued them around the tower in two sets, the first is near the top and the second is about 1/4 of the way down from the top. Finally, I have shortened these towers by about 40% as the finished product needed to be shorter than the model was intended.
Here we have the first four towers completely assembled.
Here is the fifth tower from the second set. I have left it closer to its intended height as it is for a different purpose than its four brotheren. On the left scraps from the first four towers are used to generate a cute mini tower. I have also added a feature to both that provides the second clue to where this project is going.
Borrowing a page from Anton, I then needed some small bunkers. I saw some paper models on ebay, but decided "I can do this"and decided to do it. So I used a small model tent (editorial note, the tent is part of a collection destined for Anton as he has been running a lot of bushwacking scenarios when we gamed and I wanted him to have some better terrain) as the model and traced the tents on a 3x5 card.
I then traced some fold lines on the card to guide my foldings for construction.
Folding accomplished.
I need two bunkers so here the four pieces have been generally glued together. Only the ends are still loose. My friend Elmer took care of the fastening for me.
The ends are glued down here and the basic shape is evident.
Both Bunkers are then painted a suitable cement gray ...
Which nicely darkens up when dry. I have also painted on the doorways.
So what do the finished products look like? The British Chain Home Radar station (CH for short hand) in about 1/200 scale.
Here are the first four towers with their bunker friend.
The Swingate Chain Home station in its current state. These are the transmitting towers.
Here are the receiving towers and their bunker. Which completes a Chain Home Radar set.
The basic system could "see" out to almost 150 miles in perfect weather conditions (rare in Britain) but could still discern German planes at over 100 miles in poor weather. However it had two blind spots which were detected prior to the outbreak of hostilities and work begun to correct the deficiency. The first blind spot had to do with deflection angles and the plethora of stations built by the Brits covered the deflection angle blind spot as the spot only existed in a particular station so overlapping the stations covered these side angles.
However the second blind spot proved more tricky. The system was blind below 500 feet, so a low approach would be undetected, when an approach at the cliffs of Dover was added (the stations were built on top of the cliffs) the height of the cliffs added several hundred more feet to the blind spot.
The solution to the low altitude blind spot was the Chain Home Low system (CHL for short).
Here is a Chain Home Low Radar station. The tall tower transmits, the short tower receives, both have radar screens. The small building is where the signals are received and the brick building is the power plant to run everything.
Here is an actual photograph of an actual Chain Home Low station with the power shed obscured by the transmission tower. However, once again the Chain Home Low system had two problems. First off MUCH shorter range, 40 miles in perfect conditions, but generally only 30 miles for functional usage. This did not give nearly as much warning, but still reached across the channel and into France so was a workable situation. However, the second problem was more vexing. In standard conditions this system was still blind below 100 feet. Even in optimal conditions (again VERY rare in Britain) the CHL could not see a plane below 50 feet.
The solution to this persistent low altitude problem was the Chain Home Extra Low Radar set. (CHEL)
Here we have the CHEL set. The standard lorry is loaded with the generator spare parts and operators when in transit (this one started off mobile but later became fixed at key locations. The "operations lorry" has the radar set and monitoring equipment in it. The fuel lorry is along because the generators consumed a lot of fuel and you would not want to run out of fuel in the middle of something important. Finally, there is an unremarkable black sedan for those be-suited gentlemen who show up from time to time, un-announced to impress you with their technical expertise. The two "duece and a halfs" were free with the larger (Japanese) boats from a previous post. The fuel truck and sedan were purchased from an ebay N scale vendor.
Here we have an actual picture of a radar lorry. The set could be mounted to any lorry as it was not that big.
As far as altitude limitations,if a plane was flying, the CHEL system could see it - if it was in range. The CHEL had only one problem and that was range. Under optimal conditions it could see as much as 10 miles into the gloom. However, under real world conditions 7 miles was its maximum range. While 7 miles still seems long. Planes flying at about 400 miles an hour cover that distance in just over a minute. CHEL was used for high value targets to make sure nothing could sneak in un announced.
This is exactly the sort of project that I love in gaming. I get to combine a little research, with a little 'problem solving' and generate some eye candy for my Battle of Britain Blood Red Skies Games. The idea that all this arose from weirdo's like Baldwin and Balfour's 'ancient' sci-fi fetishes and eventually gets turned to something practical by a career bureaucrat, is simply marvelous In My Opinion. To top it all off there is also a wargaming aspect to it all as Wells was an early practitioner of wargames, which then led to King Edward becoming a devotee, and this being one of the VERY few things that Edward VII and George V agreed upon so you have more than 36 years of Kings playing these games and politicians followed them. So the next time you watch the weather radar reports, remember this is where it all started as a "less un-promising problem".


Well done sir...
ReplyDeleteThanks Gary,
DeleteI thought about trying to find more of the kits but it would only be to make damaged versions so decided to not bother, the existing ones lay down on their sides quite readily.