Track assembly detail is very good with seperately molded upper and lower runs, Caution is needed here however as there is a "front" and "rear" to the one piece suspension unit as well as to the track bits. This is not readily apparent at first glance but will cause problem if assembled wrong.For starters you will want to dry-fit the parts together to ensure that you have the track and bogie assembly both facing the same way. When gluing the track on you will also want to ensure that the tabs that the model designer thoughtfully placed on the inside of the bogie wheels is flush with the inner edge of the track so that when you attach them to the hull they are able creat a contact surface for the glue. This is a lot clearer in the photo;
Click on the picture to expand photo
The next step is putting the hull together, again I was pleased at how well thing fit together. No warping or unsightly gaps. The molding sprues have suffcient flow channels so that you can cut the part from the sprue leaving a bit of the flow channel on the part and then trim it down after the part is removed from the sprue, this greatly reduces the chance of breakage or accidental damage to the small parts. Here we see the hull parts before assembly;
and assembled, with the track units in place;
One of the things that make this set of models such a great deal is that they provide both the T-34/76 turret and the T-34/86 turret for each hull, this allows dual-use and effectively cuts the price in half. The turret provided is the for the T-34/76-43 Model which has a slightly larger and boxier turret that the earlier models of T-34. This was the most widely produced versions of the 76mm gun models. The parts fit together very well with only the slightest trace of a mold-line along the gun barrel.
And assembled:
There is one commander provided per model so you will have to decide if he is going in the 76mm turret or the 85mm turret. However you do get a total of five commanders across the five models so you won't really have a shortage of figures. Sticking him together is a little fiddly, my trick is to place the seperate arm on the work-surface with the area to be glued face-up and then put a dab of tube cement on the shoulder of the torso and then press the torso down on the arm. The glue will pick up the tiny arm and hold it in place while you adjust it to your liking.
The hatches are rather tiny as well and you may wish to use tweezers on these, I would reccomend tube cement for any hatch that is open and a tiny drop of liquid on a hatch that is closed.
I stuck the MG onto the hull and then sat the turret on it, a fine looking tank indeed!
An idea of the level of detail that plastic will allow is given by this photo of both sides of the spare track provided in the kit, it far exceeds that which is normally found on most metal or resin models.
Another significant gap in the instructions is the placement of the fuel drums and tool boxes. These are more alluded to than indicated and there are no cues on the model as to where they are to go. I checked a few photos in my library and then stuck them to the hull, you may leave the fuel drums off as they were often damaged, or discarded as they ran dry.
The finished model;
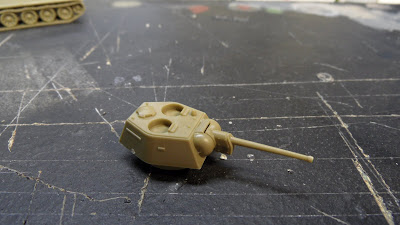
Now on to the 85mm gun turret, this is also well made with no molding or shape issues and has the added benefit of allowing the gun to elevate (helps to avoid the "broken barrel" syndrome) if you wish. The Parts:
And together;
The tiny gap at the front seam of the turret top and bottom just behind the gun is my fault, I didn't put glue there as I was afraid it would interfere with the gun moving up and down. If you use the commander figure with this model he should be in the raised cupola. A great addition to these models would be a few commander figures from the Battlefront range, they sell the commanders figure seperately on their website. And now a view of the assembled model;
I must say that I am delighted with this model, the detail of the parts is superb and the fit and finish is excellent, most highly recommended.
John


Thanks for the review. Your tips were most useful!
ReplyDeleteYou are more than welcome, I am wide open to suggestions and requests.
ReplyDeleteI hope you are enjoying the rest of the blog.
John
Is it just me, or does the 85mm gun look a bit too thick?
ReplyDelete