So, as it turns out I have managed to get four projects done at once so I have just decided to go ahead and inundate Anton's board with all of them even though this one is not quite done.
So this is just a cool store font for the Venetian game I am starting to work on. The whole reason I started playing around with the Venetian game (Carnevale by TT Combat
https://ttcombat.com/ ) is to have something different to do with the Roman buildings. However, the roof is all wrong for Rome and I am unsure about the 'cut-away corner' look so I had held off buying it for some time. However, EBay gave me some free money at the start of the month so I decided to blow it on this.
In a previous post one of the readers (Kevin or Stew, my apologies for not remembering) suggested that maybe the directions for these buildings were on line. I looked and they are, for some of the buildings. Here we see the computer screen of the dirctions (We don't need no stinkin words!) and the main elements of the kit. I have taken them parts off the mdf sheets and painted them prior to assembly.
Literally five pieces plus the floor make up the ground floor walls. Once again there is no variety of construction as four walls plug into the base and the fifth plugs into two of the others. The wall at the back of the building with only one window is the wall that plugs into the other walls.
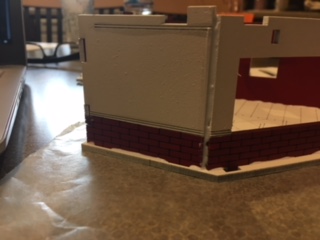
One of the oddities in this kit is that the wall with the service window does not connect to the other walls. This picture shows that there is a notable 'crack' visible. I chose to deal with this by running a bead glue down the crack to fill it in and secure the wall. There is also a wooden pin that clips these two walls together. The two cut outs at the top of the walls is where the wooden clip glues in place.
Here is the rough finished first floor. There is an mdf piece that gets glued in front of the window to make it more pronounced and look like it is trimmed that I have added. There is still a counter and signage to be added btu otherwise this level is done.
The second floor is even easier as it is back to square. The walls are once again predetermined for location as three glue onto tabs projecting from the floor and the fourth glues to the others.
Here we have the first two floors assembled. I was going to stop at this point and figure out what I was going to do for a roof on the building and post this later once done. However two things changed my mind. First this building uses wooden pegs sticking up from the floor below into the walls of the floor above, the previous kits used pegs sticking into the floor boards, this made me realize that none of the other stuff would fit so I really had no idea what I was going to do. Second, I decided that there was one thing worse than the roof that came with the Kit - No roof at all! SO I decided to build the roof. This meant that I needed to paint the roof as I had left it on the sheets.

So I went back and forth between painting the roof parts and continuing the assembly of the ready parts. Here we see the counter and signage attachment going on the kit. They actually give you prepared signs for a: merchant, tailor, blacksmith, and a blank one as well. They can be swapped around as they sort of "clip in" to the brackets above the window.
Next, I installed the exposed brick corners. A third oddity in this kit in and of themselves. Unlike the high rise I build previously where the exposed stone just buts up against each other at the corner, here the two pieces interlock. It is best to move swiftly and get both pieces glued and on the building approximately in the right spot. Then fiddle with the both of them to get the alignment correct.
Here you can see the two pieces positioned properly.
Here is the front of the building with the exposed brick work completed.
Here is the back of the first floor with the brick work finished.
Meanwhile the roof parts were dried so I began their construction. The roof itself consists of 29 parts and gives the look of being tricky, but in actuality it goes together easily enough. Here the four side boards are glued onto the roof proper.
Next the 20 braces that hold the roof edge are glued in place. It is rather important to take the time to sand, or file as I prefer, the rough edges from removal of the sprue prior to gluing in place as the mdf has a bad habit of soaking up the glue and hardening in a way that prevents proper attachment. A little bit of leftover mdf fluff that has soaked up some glue is much harder to remove than the fluff was by itself.
While there are 20 of them, once prepped up they slide easily into place.
Finally, the roof edge is added to complete the roof.
Once it dries, here is a picture of the assembled building front.
And a slightly higher elevation to see the roof itself.
Finally, once a coat of gray wash has dried on the outside and a coat of black wash has dried on the inside. VOILA! Here is the finished model from the front.
And here is a view of it from the back.
I once again really like these kits from TT Combat. They turn out very nice, feel very sturdy, and look fantastic in my opinion. I have decided that to finish this I am going to add a small building on top of the roof thus changing the look into something more Roman in appearance. Now I just need to find that add-on building.
Meanwhile my larger order from TT Combat has apparently been sitting in their ware house for a month. I emailed them two days ago and they leapt into action. I should have it in hand at the start of next week. So look for more to follow as I round out the building collection.


A great looking building!
ReplyDeleteThanks Ray, this whole range is pretty fantastic looking and most of it offers to opportunity for going more vertical than any other company.
ReplyDelete