Something Churchill prayed to have for several years.
So we in Michigan had one decent day last weekend, while we were all under house arrest. So I grabbed my three boxes of Zvezda, JU-88 bombers (the standard Nazi "heavy" bomber of WWII), sat on my front porch to avoid upsetting my wife with the smell and glued the three bomber together. I decided this time instead of giving another painting demonstration, I would do a build demonstration, and since it is the last of these bombers I am doing it will work out well as if anyone looks these posts over they will now see the build post first and then see all the painting demonstrations afterward. The builds are all generally the same. The planes go together generally easily, but there is always a problem or two.

First things first, you need the proper tools. "Man without tools is just a weak hairless ape." I read that in one of my favorite author's book (Wil Cuppy, I believe it was How to Attract the Wombat). Here are the standard model tools: a pair of clippers, an xacto, and some testors liquid cement (I was seriously concerned I might not have enough, but it worked out fine).
Next we will need our model, still on the sprue. There are 12 pieces in each model I will be making (plus two clear canopy bits.that I am not initially assembling to keep them clear). There are four other pieces on the sprue, to have the landing gear down, but these are inflight models so they will have the gear retracted.
Here are the twelve pieces: Wings (1 piece), fuselage, (1 piece), tail planes (2), underside of engine nacells (2), ventral (belly) gun position (1), a weird piece that goes inside the cockpit and simulates the three defensive MG's (1 forward and two rearward) that are fired from the cockpit (1), external bombs (4); and that is all!
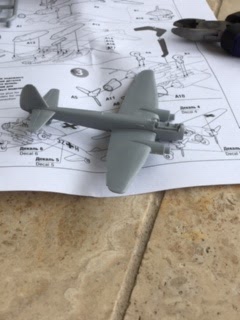
The basic assembly is three steps. Here the tail planes have been added. The Fuselage has been glued to the wings and the dorsal (top) defensive piece is glued in. Tis last piece has a peg inside the cockpit so it "should" be easy.
Here the ventral rearward firing mg has been added and the engine nacelles have been glued on and then the bombs were attempted. Here I discovered the first problem. YOU NEED TO PUT THE BOMBS ON FIRST! Wow is it difficult to add the bombs after the engine nacelles are in place. Typical instructions "do all this stuff". The down side of using liquid weld products is that if at first you do not suceed, the attachment point is ruined. One of my bombs would not glue on straight because I welded off the pins it attaches with to the plane.
So, after I glued the propeller hubs and blades (1 piece) on, I went and got my pair of tweezers. Troublesome bomb in foreground.
Back at it with model two. Step one completed: wings, fuselage, and tails all glued flawlessly, but this time inexplicable the peg the top defensive MG's goes on broke off as I was removing the fuselage from the sprue, so I just glued the MG plate in place by eyeball (it worked out fine in the end.
Here you can clearly see that the little bit of peg that should be showing through the MG plate is missing.
Defensive gondola first, bombs second, then nacelles last works MUCH better.
The rest of the second plane went together without issue, but despite more care in removal from the sprue the little nub broke off again from where the MG plate goes on. So this first step required an "eyeball installation which work fine in the final analysis.
Finished plane with the propellers attached.
Here we have all three bombers completed from a top view.
Here are all three bombers completed from the bottom view.
A closer view of the completed bottom view.
Here is the completed view from the top.
Here is an even closer view of the bottom. You will notice the two holes in the bottom of each nacelle. These are for the landing gear to be mounted, if you want the planes standing on the ground for some reason. The rectangular hole between the bomb pairs is for mounting on a flight stand. These holes filled in relatively easily during painting. The usual multiple coats were required and the holes disappeared.
This was the painting guide that I followed when painting the models, the bottom view in particular.
And here are the three bombers finished up. The cockpit canopies fit flawlessly on all models. The front glass worked much better this time than the Tupolov's, but then it only had on peg to go on this time instead of the two with the Tupolov. Also, there are no machine guns protruding ti demand a proper orientation either.
Overall the planes go together easily and one problem was inconsequential as the cockpit came together without hitch. The other problem that developed was the propeller blades. While these were better than the ones on the Tupolov, which broke off during assembly, these were still too fragile an at least one blade was broken, or so loose it was bound to fall off by the time the planes were done. I therefore removed all the blades and just simulated rotating propellers.
So there you have it. Once again, low cost, easy to assemble, good accuracy and some wafer thin parts which do not stand up to assembly, but the finished project gets the job done and now the Germans are ready to bomb Britain ... and France ... and Belgium ... and Poland ... and Spain.


takka takka takka takka.... can you hear the soundtrack playing in the background. Best movie EVER on air combat!
ReplyDeleteStuff looks nice bro.
Cheers
Kevin
Nice work!! All you need is a few stukas
ReplyDeleteIf the wings come in top and bottom pieces, I find it is worth painting the wing surfaces before assembly as you can then get a really neat line between upper and lower wing paint...
ReplyDeleteThis comment has been removed by the author.
ReplyDeleteThanks guys,
ReplyDeleteKevin we need the high pitched whine as the faster planes blow past.
Gary, I have the Stukas, I just did not do a post on them. When the semester was running normally I had time to get the planes done, but not enough to do a post.
Ed, I agree completely, but these were one solid piece. In fact all of these planes from the range are one piece wings. Although most are left/right one piece each. Only the Nacelles are separate.I think it was just a simplification process as these are only intended for gaming.